
Embrace Your Power Through Art

Part 1: See, Think, Wonder, Connect
Teacher Note: Prior to the lesson, create your own whole class version of the “See/Think/Wonder” guidesheet on chart paper so you can facilitate the activity alongside the students
Introduce
- Share with students that they will be looking at an artwork without knowing the artist or title.
- Give each student a copy of the “See/Think/Wonder” guidesheet and use this visual thinking strategy as the whole class to look at Janet Taylor Pickett’s artwork titled And She was Born.
- IDENTIFY: Ask students to share some of the things they noticed in the painting. Remind them to resist interpreting and just describe what they notice.
- Jot down what they notice under the whole class “See” column. Students should also jot down some of the noticings on their guidesheet.
- EXPRESS: Next, ask students to dig deep. Have them jot down some things the artwork makes them think about and what they think is going on on their guide sheet.
- As a whole class ask them to share their responses. Jot down responses under the whole class “Think” column.
- EMPATHIZE: Finally, ask students to jot down some things that the artwork makes them wonder, under the “Wonder” column of their guidesheet.
- Ask them some guiding questions:
- What are you left to wonder about?
- Why might the artist be standing this way?
- Why might the items on her head?
- As a whole class, ask them to share their responses. Jot down responses under the whole class “Wonder” column.
- Ask them some guiding questions:
- IDENTIFY: Ask students to share some of the things they noticed in the painting. Remind them to resist interpreting and just describe what they notice.
- CONNECT: After the See/Think/Wonder activity, as a whole class, discuss:
- Overall, what do you think about this painting?
- If you had the chance to name this painting, what would you call it? Why?
- What do you think the artist may have been trying to tell us with this painting? Can you connect that to anything in your own life? (Have students look at the patterns, colors, lines to make connections.)
- Explain: The head is a painted head of a Surma woman from the Omo Valley in Ethiopia. The Surma people adorn their heads and bodies with artful arrangements of flowers, leaves, and fruit, as seen in the artwork.
- In small groups of 3-4, explain to students that they will look at different parts of the painting more closely. Provide each student with a copy of the See/Connect worksheet.
- After they’ve completed the worksheet, as a whole class, discuss:
- Does the pose remind you of anything? If yes, what?
- Does the headdress feel heavy, fun, whimsical?
- What items does the person carry on their head? Why is she carrying them?
- If you were carrying something on your head, what would you carry? Why?
- Do the patterns around the edge remind you of anything?
- After they’ve completed the worksheet, as a whole class, discuss:
Part 2: The Power Pose
Explore
- Share with students the varied poses from multiple artworks from The Phillips’s permanent art collection.
- For each image, have students mimic the movements of the artwork.
- EMPATHIZE: As students are doing each pose, ask them:
- How does this pose feel physically? (uncomfortable, natural, etc.)
- How does it make you feel emotionally? Do you feel strong, weak, tired, scared, small, big, silly etc.?
- What do you think these characters might be feeling based on their pose? What makes you think that?
- EMPATHIZE: As students are doing each pose, ask them:
- Using the Power Pose Exercise Guide, walk students through the guided Movement Power activity to help them create their own power poses.
- Once students have completed the exercise, take photos of each student holding their pose. Be sure to save and/or print out their poses so that they can use them for the collage activity.
- Teacher Note: If printing photos is not available, students can use these provided silhouette outlines. Or, students can trace their silhouette by:
- Tape a piece of paper on the wall
- One student poses in front of the piece of paper
- A second student points a flashlight at them from a few feet away, casting a shadow on the paper
- A third student (or the teacher) traces the silhouette onto the paper
- Teacher Note: If printing photos is not available, students can use these provided silhouette outlines. Or, students can trace their silhouette by:
Part 3: Showcasing Beauty and Strength Through Art
Reflect and Express
- Explain to students that they will be making collages and that they will now brainstorm ideas for their artwork, starting with thinking about who they are.
- Have students complete the Identity Art Collage Brainstorm worksheet independently.
- Once students have finished brainstorming, call on some students to share out their responses.
- Explain to students that they will use their Power Pose selfie photo and the ideas written on their brainstorming worksheet to create a unique collage.
- If students haven’t been exposed to collage before, explain to them that collage comes from the French word “coller” which means to glue and that a collage is a piece of art made up of different items such as magazines, newspaper clippings, fabric, or other found objects.
- Show students teacher-made examples.
- Tell students that for their collages, they will use magazines, colored paper and other materials provided.
- Teacher Note: Have collage magazines and torn out pages organized into themes to help cut down on students having to search through them. Examples of themes include: people, animals, food, patterns, nature.
- As a whole class, review the collage techniques guide.
- Explain each style and model a mini version of how to create them.
- Then, have students brainstorm ideas for some of those collage techniques on the second half of the guide.
- Have students create their Identity Art Collages.
- First have them cut out and glue down their selfie image on background paper.
- Then have students identify other materials they want to use.
- Refer back to the collage techniques guide as they create their collages.
- Make sure they lay everything out before gluing it down.
- Once students have completed their identity art collages, allow students to share their work with the class. For each student who shares, ask them:
- What does your power pose say about you?
- What collage techniques did you use? Why did you choose those?
- Based on your artwork, what do you hope others will learn about who you are?
- Have all students create a title for their identity art collages.
Visual Context
Here are some artwork and images to further contextualize the content of the lesson. You can incorporate the images into your lessons or use them to build your own background knowledge.
Please note: Images are available to download only for personal, noncommercial use. For any questions about image rights and reproductions, please contact imagerights@phillipscollection.org
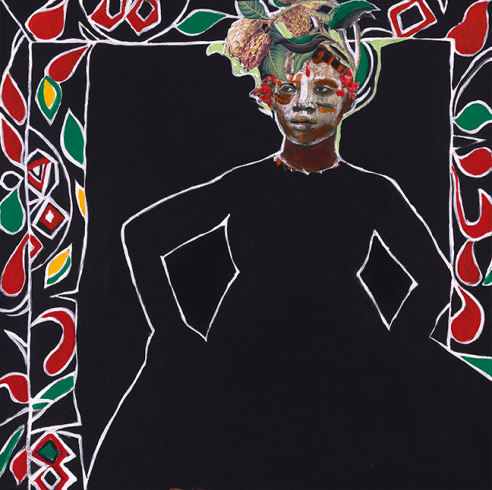
Janet Taylor Pickett, And She Was Born, 2017
Additional Context
Lesson Context
Janet Taylor Pickett combines painting and collage to create work about women in the African diaspora. And She Was Born showcases the strength and beauty of herself and Black women. The dress form— a recurring theme in Taylor Pickett’s practice—with arms in a power stance, supports the collaged artwork students will create from their power pose exercise. The head is a painted head of a Surma woman from the Omo Valley in Ethiopia. The Surma people adorn their heads and bodies with artful arrangements of flowers, leaves, and fruit, as seen in the artwork. So too will students adorn their power pose stance with images in a collage using elements of their own identity.
Key Terms
Collage: Collage comes from the French word “coller” which means to glue. It is an artistic technique that uses an assemblage of different items such as magazines, newspaper clippings, fabric, texts, or found objects, to create a new object.
Identity: The combination of characteristics, traits, beliefs, and values that make you who you are. It includes how you see yourself and how others see you. Your identity is shaped by many factors such as your personality, culture, interest, relationships and experiences. Your identity is constantly developing as you meet new people, have new experiences, and learn new things.